Thursday, September 29, 2011

Sneak Peek!

Rox and I are working on updating our shop R+J Handmade!! So I thought I'd give you a little sneak peek at what I've been making...
Fabric flowers galore...

New style of headbands...
A couple new necklace styles...

Anyway, check back soon for our update! Remember that Christmas is ONLY a few months away, and we would love for you to take a look at our shop for gift options!! :)

Monday, September 26, 2011

No-sew DIY Maxi Skirt!


Shopping for maternity clothes is a little hard where we live... I truthfully don't NEED anything between mine and Rox's maternity stashes, BUT who doesn't like something new every once in a while?? SO. I found this DIY on Pinterest (via Lauren's pinboard, thanks!!).
I couldn't start from scratch since our local fabric store doesn't sell knit fabric, and I can hardly ever make it to JoAnn's in Southaven. So, I did the next best thing and headed to Goodwill! I was hoping I could find any old long knit dress that I could alter or just use the fabric... what I found was SO much better:
A long, knit shirred-top maxi dress!! What?? The dress is in REALLY good shape, and it was the perfect size for a preggo belly! So here's what I did:
I knew I needed an elastic waistband for comfort and easy entry (that's a weird way to say it, but you know what I mean...) just like my other DIY skirt that I blogged about here. I folded the shirred top under so the top became a thick waistband (or in my case, an above-the-belly band).
I found this long knit sash in a box of random old belts and scarves from years and years ago. Sometimes it's good to hoard things. Right?? Don't answer that... I'll just move on.
I tied the old knit sash around my thrifted long maxi dress-turned-skirt and...
Here's the end result! (Just disregard the dumb face... I couldn't post another hand-on-the-hip picture... so this is what you get.) I just paired it with a simple, fitted knit shirt and...
I wore it to church with a cropped cardigan since it's FINALLY fall and it was actually a tiny bit chilly outside! And that's all. The absolute easiest DIY ever.

If I were un-pregnant (is that a word?), I assume the shirred-top dress may not stay up as easily... I think all I would have done differently is add a couple belt loops to the waistband to keep a sash or belt in place. But this could totally be a regular skirt, too! Look here and here for a couple of non-pregnant maxi skirts that look great!

Wednesday, September 14, 2011

My growing boy...

This little guy is growing. And growing. And growing. I can hardly keep up with him! I thought it had to do with the little one inside of me, but Parker's most recent doctor's appointment confirmed my suspicion... he is now in the 101st percentile for weight and 92nd for height. Yes, you read that right. This kid is going to make my arms fall off... poor Payton probably wonders what I'm trying to do to her when I hold Park-man! Thank goodness Parker likes to run and play so my arms (and Payton!) get a break. Here's what he's been up to lately...
Parker LOVES football. He LOVES to wear his jersey. He LOVES watching it with Daddy on Saturdays (and Sundays, Mondays, Thursdays, and high school football on Fridays... ). With 2 boys and 1 girl in the house right now, I'm outnumbered. But not for long!!! Let's just hope Payton likes to watch HGTV... :)

Parker cheesin'. Can you tell he likes to show off for the camera??

Yes, he's sitting on the toilet. No, he's not potty-trained yet. He just randomly wanted to sit on the potty and actually went!! He's had no more interest since, but I guess that's moving in the right direction! Let's just say I was pretty proud of my big boy!

Playing Ring-around-the-rosy at the park on a beautiful day!

Another day at the park! We took a picnic lunch one day recently and had SO much fun! Hasn't the weather been AMAZING?!

Parker's been really good at having conversations on the phone recently! He always tilts his head to the side like this... he's pretty funny to watch and listen to!

Another cheese-ball face.

Our Park-man is growing up! Along with getting bigger, he's learned SO much in the past few months. He surprises us almost daily with a new word or phrase, and we are LOVING being able to carry on actual conversations! He sings a lot, jumps a lot, dances a lot, falls down after jumping and dancing a lot, plays ball a lot (any kind)... all of that to say, we are busy with this little guy. And we can't wait to add another to the mix!! :)

Tuesday, September 13, 2011

Yummy Breakfast. Or Dessert. Synonomous, right??

I have expressed my love for Pinterest before and I'll do it again... I LOVE PINTEREST. There. I got it off my chest... I can't tell you how many lovely, awesome, beautiful, and most importantly, tasty things you can find! Today, I'm going to share a recent find in the tasty category:

I found a pin that took me here. Sopapilla cheesecake. Doesn't it even SOUND yummy?? I thought so, too. So here's my take on it:

Sopapilla Cheesecake:
Ingredients:

1 can crescent rolls
1 8 oz. package cream cheese (softened)
1/4 cup white sugar
1/4 cup brown sugar
1/2 tsp. vanilla
2 Tbsp. butter (melted)
Cinnamon & Sugar

(The original recipe calls for just white sugar, but we love the taste of brown sugar... so we split it!)

Just for looks, I bought the seamless dough. It cost just as much as the perforated Pillsbury dough so it didn't really matter. If I had found a Kroger brand of cresent rolls, I would have used that... but I didn't see any!

Preheat oven to 350!
First, step is to mix cream cheese and sugars.

Add vanilla and mix.

I could eat just the cream cheese mixture. Mmmmm.

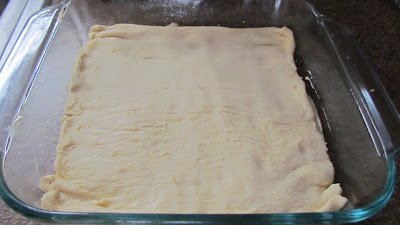
Her directions say to spread the first layer of crescent roll dough in an ungreased pan, but I didn't want to take a chance on a crusty mess. So I greased it up. You will just use half of the roll for the bottom.

Spread the cream cheese mixture over the bottom layer of dough.

And the most crucial step? Lick the bowl, beaters, and spoon. Trust me. You won't regret it!

Cover the mixture with the second half of the dough.

Spread the melted butter over the dough...

...and sprinkle your cinnamon and sugar on top.

Bake for 20-30 minutes and...
Look at that! YUM.

Both times I've made it, I've had to leave it in for the whole 30 minutes.

Serve it as soon as you can possibly stand to put it in your mouth without burning it! And since you will already be dealing with a sugar-overload, pair it with an iced coffee. You're day will be MUCH better because of it. OH. And then eat the leftovers (if there are any...) for dessert that night. Or an hour later.

Ok, that's all. Enjoy.

Monday, September 12, 2011

DIY: Dress to Skirt Re-fashion

I've told a few people that I will post of some of my sewing ventures... here's my most recent one!

One of my absolute favorite sewing projects is sewing clothes for myself. Selfish, yes?? It's just SO easy to do, and it definitely saves money. The EASIEST way to sew for yourself is to take a piece of clothing and tweak it. No cutting out tons of pieces of fabric. Not a ton of measuring. No need to hem, most of the time. It's so, so fun to "go shopping" in your own closet for clothes that you don't wear much anymore and just play around on the sewing machine to create a brand new piece for yourself (or little ones!). Shopping at the thrift store is another cheap and easy way to find clothes to re-fashion. Anyway... on to the project!

As most of you know, we are due with Parker's baby sister December 2nd so I'm dealing with an ever-growing belly. I decided to go digging in my maternity box for this fun project. I found a big, frumpy, tent-of-a-dress. I actually loved this dress when I was pregnant with Parker, but I was a little bigger this far along in my first pregnancy than I am right now... hence the tent-like shape. I wanted a little more updated look so I decided to turn it into a high-waisted "paper bag" -type skirt:

My first step was to cut off the neckline and sleeves. Straight across.

Next, I turned the skirt portion inside out, pulled it up around my waist, and tested out a good length. Once I decided the length I wanted, I folded the top portion down where I wanted it to hit (at my waist, at least what's left of it) and pinned it all the way around. (Before you pin, you can always iron down the fold to give it a nice, crisp edge.) I made sure to measure the same length from the fold to the raw edge so the length would be even.
**Sidenotes: I didn't need to add length in the front for my skirt because the dress was already a maternity dress. Also, you can tell I'm dealing with a BUNCH Of extra material where I folded the skirt over. I decided to wait to cut off the extra material just in case I decided to change the length after trying it on. Finally, you may have noticed that I didn't hem the raw edge... this dress is made of a knit material which doesn't fray! No need to worry about hemming when it won't fray and no one will see it! :)

The next image is just to show you about how far down from the fold I made my stitch to end up giving it a little bit of a paper bag skirt feel.

Next, you will make another stitch around the top of the skirt to create a tube for your elastic. My elastic is about 3/4 inch to an inch wide, and I just wrapped it around my waist to measure the length. (Remember to overlap it by at least a half inch to an inch so you can secure it together at the end.) I just used my elastic as a marker to see how far down I needed to make my second stitch and made a mark with a pin.

Go ahead and sew the second stitch. Mark all way around the skirt with pins to sew an even tube OR you can use the metal plate as a guide like I did in the picture below. REMEMBER to leave a gap the width of your elastic between where you start and finish your stitch so you can thread the elastic through!

Here's the gap:

The easiest way to thread elastic through a tube is to attach a safety pin to one end and push it through. Trust me, you will end up spending an hour trying to push the elastic through on its own!

In the picture below, I think I was trying to show you the extra fabric I cut off and the elastic I was threading through the tube... not a vital step... but in case you wondered what this step looked like, here it is:

ALMOST DONE! Once the elastic is all the way through you need to sew the elastic together. Don't worry. No one will see this, so do whatever it takes to make it secure. I usually sew a box and an 'X' through it a couple times...

Finally, (and I didn't show you because it's self-explanatory) sew along the gap you left for the elastic and turn the skirt right side out! That's all. If you want to cut a piece of fabric for a sash, you could do that at this point, or just wear a belt over cinched part. OR not... it would look great without either! Here's the final product paired with a loose shirt and a belt:
The great part about this skirt is that it will fit me until at least close to the end of the pregnancy! Another great thing? This tutorial works for you non-maternity wearing peeps. You may wear it a little differently since you probably have a waist, but the steps are just the same!

Kyle decided to do a photo shoot. Here are his lack of photography skills paired with my lack of modeling skills:

Pose #1:
Pose #2:
Pose #3:

Now that I've embarrassed myself, I will finish this forever long post... Here's a tutorial for another Paper Bag skirt tutorial and a high-waisted maternity skirt DIY. If you want to sew for yourself, this a great place to start! Let me know if you try it out! :)

Friday, September 2, 2011

More Items in the Shop!!

Our shop has been neglected... but I have a couple new things to entice you back!!! I've added hair clips, three pairs of earrings, and a bunting banner!!! Here's a quick glimpse of some of the new goodies:
Hair clips in pairs or by themselves and bobby pins!

Fabric rosette earrings

Who loves bunting?! I do! I wanted to see if this is something people are interested in... let me know what you think! Would love requests of colors and color combinations for future banners... I need feedback!

Check out our shop R+J Handmade for my new goodies OR to check out headbands, button earrings, key chains, and tea towels!!

Sweet Hubby.

I love surprises.

My hubby sent me a text message yesterday saying, "Get up and get dressed." He had to leave early, early to lead a boys' Bible study so I was still in bed waiting for little guy to wake up. My first reaction was, "Stop telling me what to do, brat." Then I realized I should get ready just in case.

After getting ready and getting excited to see what was going on, Kyle came home with a few grocery sacks... huh?? Don't get me wrong... surprising me with groceries is GREAT since I hate grocery shopping, but I wondered why I was told to get ready... "We're going on a breakfast picnic!!!" How fun! He went and bought bagels, fruit, and a special drink for all of us, and we were ready for a morning adventure!! :)

Our special drinks:
Orange Vitamin Water, Frappuccino, and what does every kid love?? Yoo-Hoo. This made me laugh out loud for some reason. Parker was in for a GREAT surprise!

We drove about 20 minutes away to Wall Doxey State Park to picnic and play. We had such a fun time! Parker LOVES playing outside and this was WAAAAAYY better than our boring little backyard!
This kid loves to cheese it up! He was such a good boy and ate MOST of his breakfast with so many distractions all around: birds chirping, a big lake, dock, playground with FUN slides, TONS of room to run, and of course the delicious Yoo-Hoo waiting for him.

We were supposed to look at the camera, but we couldn't help but check out each others' goofy faces. Silly, silly boy.

Parker and his daddy. We got to see a BUNCH of fish swimming in the lake from the dock. Park-man was such a good boy and held our hands the whole time we walked on the dock!

Drinking the Yoo-Hoo. He sucked it down. I mean FAST.

We stayed out just until it started getting steamy and headed home for a day of relaxing. We had so much fun! Thanks, Kyle/Daddy for the surprise!!